
搜索到
77
篇与
Elysian
的结果
-

-
-
windows服务器 apache配置https,http强制跳转https(搭建http与https共存) windows服务器apache搭建https环境 windows 2008 64位七牛云申请的ssl,CA证书包含三个文件:*******.key *******.cer *******_ca.crt将这三个文件放在apache安装目录下的config/extra/key文件夹中, key文件夹和httpd-ssl.conf 同级,key文件夹要自己创建。修改httpd.confLoadModule socache_dbm_module modules/mod_socache_dbm.so LoadModule socache_shmcb_module modules/mod_socache_shmcb.so LoadModule ssl_module modules/mod_ssl.so Include conf/extra/httpd-ssl.conf将上面四句的注释去掉。修改extra文件夹下面的 httpd-ssl.conf(这个很重要,修改不对的话,apache启动不了)# # This is the Apache server configuration file providing SSL support. # It contains the configuration directives to instruct the server how to # serve pages over an https connection. For detailed information about these # directives see <URL:http://httpd.apache.org/docs/2.4/mod/mod_ssl.html> # # Do NOT simply read the instructions in here without understanding # what they do. They're here only as hints or reminders. If you are unsure # consult the online docs. You have been warned. # # Required modules: mod_log_config, mod_setenvif, mod_ssl, # socache_shmcb_module (for default value of SSLSessionCache) # # Pseudo Random Number Generator (PRNG): # Configure one or more sources to seed the PRNG of the SSL library. # The seed data should be of good random quality. # WARNING! On some platforms /dev/random blocks if not enough entropy # is available. This means you then cannot use the /dev/random device # because it would lead to very long connection times (as long as # it requires to make more entropy available). But usually those # platforms additionally provide a /dev/urandom device which doesn't # block. So, if available, use this one instead. Read the mod_ssl User # Manual for more details. # #SSLRandomSeed startup file:/dev/random 512 #SSLRandomSeed startup file:/dev/urandom 512 #SSLRandomSeed connect file:/dev/random 512 #SSLRandomSeed connect file:/dev/urandom 512 # # When we also provide SSL we have to listen to the # standard HTTP port (see above) and to the HTTPS port # Listen 443 ## ## SSL Global Context ## ## All SSL configuration in this context applies both to ## the main server and all SSL-enabled virtual hosts. ## # SSL Cipher Suite: # List the ciphers that the client is permitted to negotiate, # and that httpd will negotiate as the client of a proxied server. # See the OpenSSL documentation for a complete list of ciphers, and # ensure these follow appropriate best practices for this deployment. # httpd 2.2.30, 2.4.13 and later force-disable aNULL, eNULL and EXP ciphers, # while OpenSSL disabled these by default in 0.9.8zf/1.0.0r/1.0.1m/1.0.2a. SSLCipherSuite HIGH:MEDIUM:!MD5:!RC4:!3DES SSLProxyCipherSuite HIGH:MEDIUM:!MD5:!RC4:!3DES # By the end of 2016, only TLSv1.2 ciphers should remain in use. # Older ciphers should be disallowed as soon as possible, while the # kRSA ciphers do not offer forward secrecy. These changes inhibit # older clients (such as IE6 SP2 or IE8 on Windows XP, or other legacy # non-browser tooling) from successfully connecting. # # To restrict mod_ssl to use only TLSv1.2 ciphers, and disable # those protocols which do not support forward secrecy, replace # the SSLCipherSuite and SSLProxyCipherSuite directives above with # the following two directives, as soon as practical. # SSLCipherSuite HIGH:MEDIUM:!SSLv3:!kRSA # SSLProxyCipherSuite HIGH:MEDIUM:!SSLv3:!kRSA # User agents such as web browsers are not configured for the user's # own preference of either security or performance, therefore this # must be the prerogative of the web server administrator who manages # cpu load versus confidentiality, so enforce the server's cipher order. SSLHonorCipherOrder on # SSL Protocol support: # List the protocol versions which clients are allowed to connect with. # Disable SSLv3 by default (cf. RFC 7525 3.1.1). TLSv1 (1.0) should be # disabled as quickly as practical. By the end of 2016, only the TLSv1.2 # protocol or later should remain in use. SSLProtocol all -SSLv3 SSLProxyProtocol all -SSLv3 # Pass Phrase Dialog: # Configure the pass phrase gathering process. # The filtering dialog program (`builtin' is an internal # terminal dialog) has to provide the pass phrase on stdout. SSLPassPhraseDialog builtin # Inter-Process Session Cache: # Configure the SSL Session Cache: First the mechanism # to use and second the expiring timeout (in seconds). #SSLSessionCache "dbm:c:/Apache24/logs/ssl_scache" SSLSessionCache "shmcb:C:/PHPBIN/httpd-2.4.26-win64-VC11/Apache24/logs/ssl_scache(512000)" SSLSessionCacheTimeout 300 # OCSP Stapling (requires OpenSSL 0.9.8h or later) # # This feature is disabled by default and requires at least # the two directives SSLUseStapling and SSLStaplingCache. # Refer to the documentation on OCSP Stapling in the SSL/TLS # How-To for more information. # # Enable stapling for all SSL-enabled servers: #SSLUseStapling On # Define a relatively small cache for OCSP Stapling using # the same mechanism that is used for the SSL session cache # above. If stapling is used with more than a few certificates, # the size may need to be increased. (AH01929 will be logged.) #SSLStaplingCache "shmcb:c:/Apache24/logs/ssl_stapling(32768)" # Seconds before valid OCSP responses are expired from the cache #SSLStaplingStandardCacheTimeout 3600 # Seconds before invalid OCSP responses are expired from the cache #SSLStaplingErrorCacheTimeout 600 ## ## SSL Virtual Host Context ## <VirtualHost _default_:443> # General setup for the virtual host DocumentRoot "C:\webroot\web" ServerName domain:443 ServerAdmin 249911817@qq.com <Directory "C:\webroot\web"> Options -Indexes +IncludesNOEXEC +FollowSymLinks +Includes AllowOverride ALL AddType text/html .shtml AddOutputFilter INCLUDES .shtml Include conf/extra/httpd-Ip.conf </Directory> ErrorLog "C:/logs/weblogs/error.log" TransferLog "C:/logs/weblogs/access.log" # SSL Engine Switch: # Enable/Disable SSL for this virtual host. SSLEngine on # Server Certificate: # Point SSLCertificateFile at a PEM encoded certificate. If # the certificate is encrypted, then you will be prompted for a # pass phrase. Note that a kill -HUP will prompt again. Keep # in mind that if you have both an RSA and a DSA certificate you # can configure both in parallel (to also allow the use of DSA # ciphers, etc.) # Some ECC cipher suites (http://www.ietf.org/rfc/rfc4492.txt) # require an ECC certificate which can also be configured in # parallel. SSLCertificateFile "C:/PHPBIN/httpd-2.4.26-win64-VC11/Apache24/conf/extra/key/blog.icheguo.com.cer" #SSLCertificateFile "c:/Apache24/conf/server-dsa.crt" #SSLCertificateFile "c:/Apache24/conf/server-ecc.crt" # Server Private Key: # If the key is not combined with the certificate, use this # directive to point at the key file. Keep in mind that if # you've both a RSA and a DSA private key you can configure # both in parallel (to also allow the use of DSA ciphers, etc.) # ECC keys, when in use, can also be configured in parallel SSLCertificateKeyFile "C:/PHPBIN/httpd-2.4.26-win64-VC11/Apache24/conf/extra/key/blog.icheguo.com.key" #SSLCertificateKeyFile "c:/Apache24/conf/server-dsa.key" #SSLCertificateKeyFile "c:/Apache24/conf/server-ecc.key" # Server Certificate Chain: # Point SSLCertificateChainFile at a file containing the # concatenation of PEM encoded CA certificates which form the # certificate chain for the server certificate. Alternatively # the referenced file can be the same as SSLCertificateFile # when the CA certificates are directly appended to the server # certificate for convenience. SSLCertificateChainFile "C:/PHPBIN/httpd-2.4.26-win64-VC11/Apache24/conf/extra/key/blog.icheguo.com_ca.crt" # Certificate Authority (CA): # Set the CA certificate verification path where to find CA # certificates for client authentication or alternatively one # huge file containing all of them (file must be PEM encoded) # Note: Inside SSLCACertificatePath you need hash symlinks # to point to the certificate files. Use the provided # Makefile to update the hash symlinks after changes. #SSLCACertificatePath "c:/Apache24/conf/ssl.crt" #SSLCACertificateFile "c:/Apache24/conf/ssl.crt/ca-bundle.crt" # Certificate Revocation Lists (CRL): # Set the CA revocation path where to find CA CRLs for client # authentication or alternatively one huge file containing all # of them (file must be PEM encoded). # The CRL checking mode needs to be configured explicitly # through SSLCARevocationCheck (defaults to "none" otherwise). # Note: Inside SSLCARevocationPath you need hash symlinks # to point to the certificate files. Use the provided # Makefile to update the hash symlinks after changes. #SSLCARevocationPath "c:/Apache24/conf/ssl.crl" #SSLCARevocationFile "c:/Apache24/conf/ssl.crl/ca-bundle.crl" #SSLCARevocationCheck chain # Client Authentication (Type): # Client certificate verification type and depth. Types are # none, optional, require and optional_no_ca. Depth is a # number which specifies how deeply to verify the certificate # issuer chain before deciding the certificate is not valid. #SSLVerifyClient require #SSLVerifyDepth 10 # TLS-SRP mutual authentication: # Enable TLS-SRP and set the path to the OpenSSL SRP verifier # file (containing login information for SRP user accounts). # Requires OpenSSL 1.0.1 or newer. See the mod_ssl FAQ for # detailed instructions on creating this file. Example: # "openssl srp -srpvfile c:/Apache24/conf/passwd.srpv -add username" #SSLSRPVerifierFile "c:/Apache24/conf/passwd.srpv" # Access Control: # With SSLRequire you can do per-directory access control based # on arbitrary complex boolean expressions containing server # variable checks and other lookup directives. The syntax is a # mixture between C and Perl. See the mod_ssl documentation # for more details. #<Location /> #SSLRequire ( %{SSL_CIPHER} !~ m/^(EXP|NULL)/ \ # and %{SSL_CLIENT_S_DN_O} eq "Snake Oil, Ltd." \ # and %{SSL_CLIENT_S_DN_OU} in {"Staff", "CA", "Dev"} \ # and %{TIME_WDAY} >= 1 and %{TIME_WDAY} <= 5 \ # and %{TIME_HOUR} >= 8 and %{TIME_HOUR} <= 20 ) \ # or %{REMOTE_ADDR} =~ m/^192\.76\.162\.[0-9]+$/ #</Location> # SSL Engine Options: # Set various options for the SSL engine. # o FakeBasicAuth: # Translate the client X.509 into a Basic Authorisation. This means that # the standard Auth/DBMAuth methods can be used for access control. The # user name is the `one line' version of the client's X.509 certificate. # Note that no password is obtained from the user. Every entry in the user # file needs this password: `xxj31ZMTZzkVA'. # o ExportCertData: # This exports two additional environment variables: SSL_CLIENT_CERT and # SSL_SERVER_CERT. These contain the PEM-encoded certificates of the # server (always existing) and the client (only existing when client # authentication is used). This can be used to import the certificates # into CGI scripts. # o StdEnvVars: # This exports the standard SSL/TLS related `SSL_*' environment variables. # Per default this exportation is switched off for performance reasons, # because the extraction step is an expensive operation and is usually # useless for serving static content. So one usually enables the # exportation for CGI and SSI requests only. # o StrictRequire: # This denies access when "SSLRequireSSL" or "SSLRequire" applied even # under a "Satisfy any" situation, i.e. when it applies access is denied # and no other module can change it. # o OptRenegotiate: # This enables optimized SSL connection renegotiation handling when SSL # directives are used in per-directory context. #SSLOptions +FakeBasicAuth +ExportCertData +StrictRequire <FilesMatch "\.(cgi|shtml|phtml|php)$"> SSLOptions +StdEnvVars </FilesMatch> <Directory "C:/PHPBIN/httpd-2.4.26-win64-VC11/Apache24/cgi-bin"> SSLOptions +StdEnvVars </Directory> # SSL Protocol Adjustments: # The safe and default but still SSL/TLS standard compliant shutdown # approach is that mod_ssl sends the close notify alert but doesn't wait for # the close notify alert from client. When you need a different shutdown # approach you can use one of the following variables: # o ssl-unclean-shutdown: # This forces an unclean shutdown when the connection is closed, i.e. no # SSL close notify alert is sent or allowed to be received. This violates # the SSL/TLS standard but is needed for some brain-dead browsers. Use # this when you receive I/O errors because of the standard approach where # mod_ssl sends the close notify alert. # o ssl-accurate-shutdown: # This forces an accurate shutdown when the connection is closed, i.e. a # SSL close notify alert is send and mod_ssl waits for the close notify # alert of the client. This is 100% SSL/TLS standard compliant, but in # practice often causes hanging connections with brain-dead browsers. Use # this only for browsers where you know that their SSL implementation # works correctly. # Notice: Most problems of broken clients are also related to the HTTP # keep-alive facility, so you usually additionally want to disable # keep-alive for those clients, too. Use variable "nokeepalive" for this. # Similarly, one has to force some clients to use HTTP/1.0 to workaround # their broken HTTP/1.1 implementation. Use variables "downgrade-1.0" and # "force-response-1.0" for this. BrowserMatch "MSIE [2-5]" \ nokeepalive ssl-unclean-shutdown \ downgrade-1.0 force-response-1.0 # Per-Server Logging: # The home of a custom SSL log file. Use this when you want a # compact non-error SSL logfile on a virtual host basis. CustomLog "C:/logs/ssl_request.log" \ "%t %h %{SSL_PROTOCOL}x %{SSL_CIPHER}x \"%r\" %b" </VirtualHost> 这个里面的注释太多了,一个一个对着修改就好啦,domain是自己的域名,还有日志文件的路径最好修改成对应自己apache安装目录下的logs文件夹,不然后面检查的时候会报错。修改好以后,可以先尝试重启apache服务,如果重启不起来,这个时候就可以把第3步里的include 那个给注释掉,然后再重启,如果重启成功,说明还是第四步的httpd-ssl.conf的配置有问题,这个时候可以打开 cmd窗口,进入apache安装目录下的bin文件夹 然后输入命令 httpd -t 检查错误, 提示错误就根据错误修改, 如果是ok 那就代表没有语法错误,检查一下有没有漏掉的内容,确认无误后即可重启apache,我通过 httpd -t 检查结果是ok 以后 apahce就可以正常运行了,这个时候 用https开头 就可以访问项目了,当然,访问项目可能绿色小锁还是带黄色感叹号,这个时候就要更改页面上的http链接,模板里面body体里面的所有http都换成https以后,网站就是绿色小锁了,多半都是图片的链接。http强制跳转https(搭建http与https共存)推荐方法:Apache 配置 单个项目 http重定向到https1.还是和上面一样,在httpd.conf去掉下面这一句的#LoadModule rewrite_module modules/mod_rewrite.so2.新建.htaccess文件(windows系统就是新建 .htaccess. 文件,后面加个 . 就可以创建了)然后输入如下规则RewriteEngine on RewriteCond %{HTTP_HOST} ^www.domain.com [NC] RewriteCond %{SERVER_PORT} !^443$ RewriteRule ^(.*)$ https://%{SERVER_NAME}%{REQUEST_URI} [L,R]` 这个domain根据自己的网址修改。
-
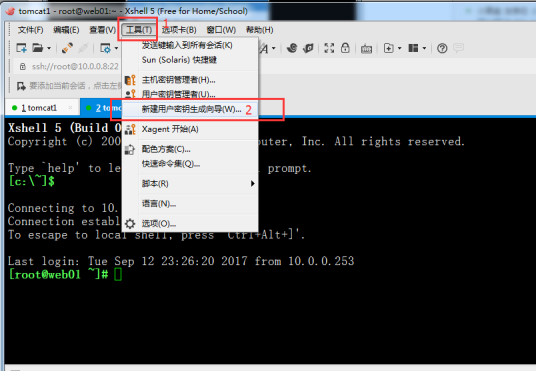
Centos SSH 免密码互通及Xshell配置ssh免密码登录-密钥公钥(Public key) 一、配置SSH互通1,修改主机名。vi /etc/sysconfig/network NETWORKING=yes HOSTNAME=centos1 vi /etc/hosts #末尾添加 ip 主机名 192.168.9.129 centos1 hostname centos1 #修改主机名临时生效2, 无密码登录实现2.1、用ssh-keygen创建公钥(每台服务器都需要执行)[root@centos1 ~]# ssh-keygen -t rsa Generating public/private rsa key pair. Enter file in which to save the key (/root/.ssh/id_rsa): Enter passphrase (empty for no passphrase): Enter same passphrase again: Your identification has been saved in /root/.ssh/id_rsa. Your public key has been saved in /root/.ssh/id_rsa.pub. The key fingerprint is: a0:85:f4:58:d4:c7:2f:d9:ae:b1:04:91:b1:a0:9e:93 root@centos1 The key's randomart image is: +--[ RSA 2048]----+ | ..+..+ | | . * .+.o | | + + .o + | | . = .. o o | | E S. o | | . o . | | . + | | o | | | +-----------------+免密码互通,直接回车完成。ssh-keygen:生成秘钥其中:-t指定算法-f 指定生成秘钥路径-N 指定密码2.2、查看生成的钥匙[root@centos1 ~]# cd .ssh/ [root@centos1 .ssh]# ls id_rsa id_rsa.pub known_hosts2.3 将公钥复制到被管理机器下的.ssh目录下(先确保存在这个目录)我这里是单机,就不需要执行这步操作。接着执行[root@centos1 .ssh]# cat id_rsa.pub >> ~/.ssh/authorized_keys [root@centos1 .ssh]# ls authorized_keys id_rsa id_rsa.pub known_hosts3、设置文件和目录权限:设置authorized_keys权限chmod 600 authorized_keys设置.ssh目录权限chmod 700 -R .ssh验证是否成功[root@centos1 .ssh]# ssh centos1 Last login: Thu Dec 17 10:15:52 2015 from 192.168.9.1二、Xshell配置ssh免密码登录-密钥公钥(Public key)简介ssh登录提供两种认证方式:口令(密码)认证方式和密钥认证方式。其中口令(密码)认证方式是我们最常用的一种,这里介绍密钥认证方式登录到linux/unix的方法。使用密钥登录分为3步:生成密钥(公钥与私钥);放置公钥(Public Key)到服务器~/.ssh/authorized_key文件中;置ssh客户端使用密钥登录。1、生成密钥(公钥与私钥)打开Xshell,在菜单栏点击“工具”,在弹出的菜单中选择“(新建用户密钥生成向导)”,如下图:弹出“新建用户秘钥生成向导”对话框,在“秘钥类型”项选择“RSA”公钥加密算法,“秘钥长度”选择任意密钥长度,长度越长,安全性越高,如下图:点击“下一步”,等待密钥生成继续下一步,在“秘钥名称”中输入Key的文件名称,我这里为“id_rsa_2048(2)”;在“加密密码”处输入一个密码用于加密私钥,并再次输入密码确认,如下图:点击“下一步”,密钥生成完毕(Public key Format选择SSH2-OpenSSH格式),这里显示的是公钥,我们可以复制公钥然后再保存,也可以直接保存公钥到文件,如下图。点击“保存为文件”按钮,将公钥(Public key)保存到磁盘,文件名为“laomao”,备用。最后点击“完成”即可。公钥保存完后,接下来为私钥文件。点击“导出”,导出为私钥文件,用来打开刚才的公钥。请妥善保管。点击“保存”后,会弹出一个框,输入刚才设置的密码123456.在点击“确定”即可。2、放置公钥(Public Key)到服务器~/.ssh/authorized_key文件中上面的步骤只是生成了公钥和私钥的过程,接下来就是要将刚才生成的公钥放到要管理的服务器上。使用到Xshell登录到服务器,进入到“/root/.ssh/”目录,运行rz命令(如果没有rz命令,运行yum install lrzsz安装),将key.pub发送到服务器,然后运行如下命令,将公钥(Public Key)导入到“authorized_keys”文件:[root@mysql-db01 ~]# cd .ssh/ [root@mysql-db01 .ssh]# ls authorized_keys known_hosts [root@mysql-db01 .ssh]# rz -E rz waiting to receive. [root@mysql-db01 .ssh]# ls authorized_keys known_hosts laomao.pub [root@mysql-db01 .ssh]# cp authorized_keys authorized_keys.bak [root@mysql-db01 .ssh]# cat laomao.pub >authorized_keys [root@mysql-db01 .ssh]# cat authorized_keys ssh-rsa AAAAB3NzaC1yc2EAAAABIwAAAYEAybjy7/DVWxXm4lcXFA+x0bgBMi+aQ6zIzyBfFSKJEMhAhs/MxbKHOl1c1GwzPSAKLAHoR8UZSQO7QQcYKqeb8cNWR8f9NGNBCJs+e6Fpl7BvNPKfNrixnq+gT5VIz77u2RXU74JBOuwsgaEHtCU5DQhIfvAoUe64qCBuY5J6JHJV3bBlMXnqxrJQO4+4hH0dHyVzc5wmP0ngnah/6za64hk3Nd1tdER7na701geZTR5N4OqeCep+TtPcbT4RKQ1qJ5L67ET5x3uYGEKZDK4tOL2kluePd2XHRQg1qcXl87f7HkZiLIicgLU8/rB+LyUOJzywTVHvmTWTPDS1u6RmAQSLh/4VU0vEks7bIj7xTCaKjuO6UgHvxPZL1BQWj8tY6fzerdndVM5bORkAHgZ67ZJK6X+Zui4fHTkxSQ/gvzOgBylhSL3Tyc1PRlVO8L7bl9r36x7hlACHr0BrqpenrkxdMmrR4i4RoOrYaijXoPhvg5uWH+rSeUbZDDEw7S/F[root@mysql-db01 .ssh]# [root@m01 .ssh]# chmod 600 authorized_keys [root@m01 .ssh]#3配置ssh客户端使用密钥登录打开Xshell,点击“新建”按钮,弹出“New Session Properties”对话框,在“连接”栏目中,输入刚刚配置好公钥(Public Key)的IP地址和端口,如下图所示:在用户身份认证的窗口输入认证方法为“public key”从用户秘钥出选择刚生成的私钥文件,并在下面的密码框中输入刚才设置的密码123456(可以和系统登陆密码不一样)现在就可以使用公钥登陆了,浏览选择用户秘钥位置,然后输入上面刚刚设置的密码“123456”,点击“确定”,即可登陆。经过了上面的ssh秘钥配置后,我们就可以通过在Publish over SSH插件中使用秘钥来管理服务器了。注意,服务器上存放的是上面生成的公钥,Jenkins上存放的是生成的私钥文件。参考文章:(经过测试)https://www.cnblogs.com/dadonggg/p/8350423.htmlhttp://aiuxian.com/article/p-ficywqgl-oz.html
-
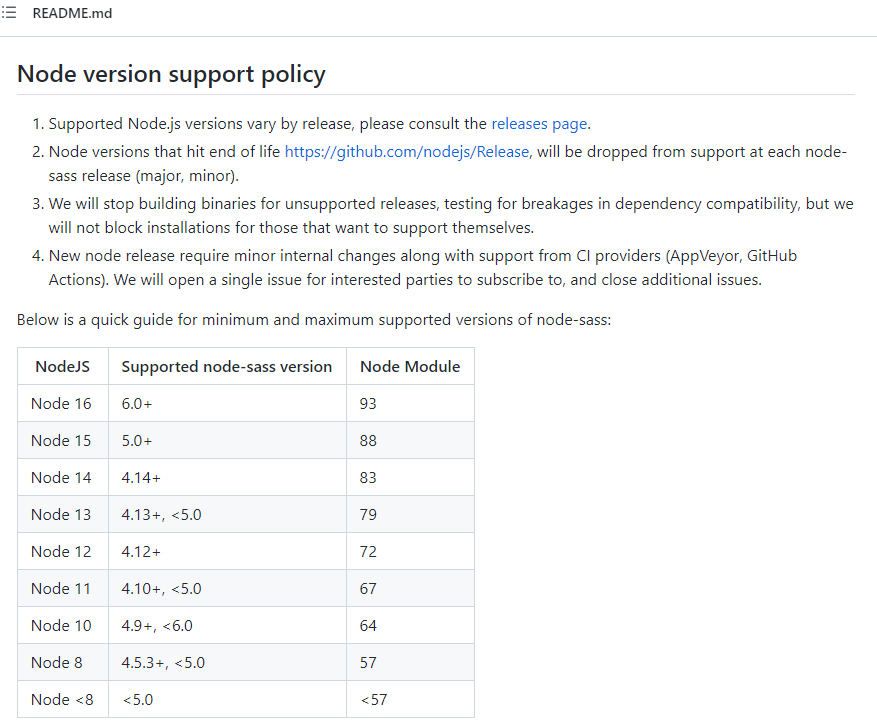
记录处理node-sass包install安装错误的一系列解决方式 今天打开前几个月写的基于nuxt的项目,要修改一些内容,本以为和以前处理方式一样,修改代码,然后打包发布就可以了。结果build报错,错误大概如下几种:Node Sass does not yet support your current environment: Windows 64-bit...node-sass invalid syntaxnode-sass not found: python2nuxt node-sass Error: Command failed: C:Program Files (x86)Python37-32pyt百度查了很多资料,一开始以为是本地python3.7版本的问题,因为在这几个月中升级了python,后面查到一些资料说是需要使用淘宝的npm 镜像,经过各种尝试无果后,仔细思考了一下这几个月针对影响这个项目做了哪些操作。思前想后,觉得应该是本地环境做了升级,才导致这些问题。有了大概思路后,就需要排错先将python卸载,然后发现与python无关。既然与python无关,那肯定就与node 版本有关系了,这几个月也就升级了node和python,然后果断访问node-sass的github发现问题果然出在node版本和node-sass版本不兼容上。发现问题就可以解决,因为node版本过高,想的是先降级node,所以选择了重新安装node,但是其他项目又需要新版本的node,所以选择了先安装nvm,具体安装教程可以查看 node版本管理工具nvm的安装与使用切换完低版本的node后,再重新build项目,成功通过。总结这个问题让我对node及node组件版本有了更深的了解,也对整体的开发关联版本类东西有了更深的了解。