搜索到
77
篇与
Elysian
的结果
-
 微信小程序:计算属性的两种体现方式及应用场景 在wxml文件中使用的计算属性很多时候我们需要将数据加工后再显示到页面上,例如,我在显示排行榜的循环中,排名我需要在个位数之前补0这样的操作时就需要在wxml页面中使用到计算属性。微信小程序的计算属性和vue有所不同,在页面中使用的时候可以如下:<view class="container"> <wxs module="fn"> module.exports = { reverse: function(str) { return str.reverse() }, arr2Str: function(arr) { return arr.join('、') } } </wxs> <text>{{ fn.reverse('大海爱奔跑') }}</text> <text>{{ fn.arr2Str(['Vue', 'Node', '小程序', 'JS', 'CSS']) }}</text> </view>计算属性有时候可能需要使用到 data,但是在页面中的计算属性没办法直接拿到data,使用只能当做参数传入其中。<wxs module="fn"> module.exports = { getText: function(keyword, length) { // 这里不能使用`${xxx}`格式,否则报错 return '关键词' + keyword + '匹配到 ' + length + ' 个结果' } } </wxs> <!-- 这里传入keyword和names.length,上面的getText则可以使用 --> <view class="key">{{ fn.getText(keyword, names.length) }}</view>在JS文件中使用的计算属性上面我们讲了微信小程序页面上的计算属性使用,现在来介绍一下微信小程序在js文件中计算属性的使用,这其中就需要用到npm模块了。安装npm模块npm install --save miniprogram-computed具体使用方法const computedBehavior = require("miniprogram-computed").behavior; Component({ behaviors: [computedBehavior], data: { a: 1, b: 1, }, computed: { sum(data) { // 注意: computed 函数中不能访问 this ,只有 data 对象可供访问 // 这个函数的返回值会被设置到 this.data.sum 字段中 return data.a + data.b; }, }, methods: { onTap() { this.setData({ a: this.data.b, b: this.data.a + this.data.b, }); }, }, });以上就是微信小程序中关于计算属性的两种使用方法和场景,参考了网络上的其他人的帖子总结而来转载自:https://developer.aliyun.com/article/813779https://segmentfault.com/a/1190000041022284?sort=votes
 -
 windows下apache、mysql、服务安装启动命令 1、首先要保证你的mysql和apache文件配置正确;如果不正确是无法启动服务,可以去事件查看器-windows日志-应用程序中查看具体问题;apache服务相关命令1. 安装/卸载Apache服务1) 安装apache服务httpd.exe -k install2) 指定要安装的服务的名称(适用于电脑上有几个不同的Apache服务设施)httpd.exe -k install -n "MyServiceName"3) 指定服务配置文件的路径和名称httpd.exe -k install -n "MyServiceName" -f "c:filesmy.conf"注:若不使用特殊参数(如httpd.exe -k install),服务名称为Apache2.X,配置文件为confhttpd.conf4) 移除一个Apache服务httpd.exe -k uninstall5) 移除特定的Apache服务httpd.exe -k uninstall -n "MyServiceName"2. 管理Apache服务1) 启动已安装的Apache服务httpd.exe -k start2) 停止已安装的Apache服务httpd.exe -k stop || httpd.exe -k shutdown3) 重启已安装的Apache服务(迫使服务重读配置文件,适用于修改配置文件后)httpd.exe -k restartMysql服务相关命令切换到mysql的bin目录下输入mysqld -install命令安装mysql服务输入mysqld --initialize-insecure --user=mysql 初始化mysql服务,并初始化user表输入net start mysql启动mysql服务打开任务管理器,查看服务可以看到服务以启动
 -
 微信小程序父子组件方法调用方法汇总 父组件向子组件传值父组件通过属性传值<childEle childParams="{{params}}"></childEle>子组件通过properties接收:properties: { childParams: { type: String } }子组件调用父组件方法父组件定义方法,childFun是子组件中的方法名,fun是父组件中的方法名。我们通过chidlFun来调用fun。<childEle childParams="{{params}}" bind:childFun="fun"></childEle>父组件方法:childFun(e){ console.log('我是父组件的方法', e) }当点击子组件的按钮执行 clickFun 时调用父组件的方法clickFun(){ this.triggerEvent('childFun');//如果需要传递参数,直接写在triggerEvent的参数里即可 }父组件调用子组件的方法<childEle id="childEle" childParams="{{params}}" bind:childFun="fun"></childEle>父组件的 onReady 生命周期中获取 childEle 元素onReady(){ this.childEle = this.selectComponent('#childEle'); }父组件的点击事件 childF 调用子组件的事件:<view bindtap="childF">我是父组件的点击事件</view>父组件触发子组件的方法:childF(){ this.childEle.foo() }这里的 foo即为子组件的方法。文章转自:https://blog.csdn.net/sinat_33255495/article/details/121113589
 -
 mongodb在修改数据时,使用原有值更新内容 其实需要时间的内容在其他数据库中很简单,例如mysql如下:update news set click=click+1 where addtime>'2022-01-01';但是,在mongodb中查询了很多update的相关资料,在update方法中,没找到批量通过原有值修改的方法;(mongodb基础薄弱,可能最终还是因为我没找到,以后找到了补上)最终使用的先查询出结果,然后forEach的方式处理了,具体如下:db.集合名.find({这里可以写你的筛选条件}).forEach( function(item){ db.集合名.update( {"_id":item._id}, {"$set": {"CreatedTime":new Date(item.CreatedTime.getTime() + 1*60*60000)}}) })解释:1、为什么不直接用 update 去查询并更新,还要分成两个步骤写?对于这些数据,我是要在原有数据的基础上做修改,也就是【个性化】修改,直接使用update 的话,更新的字段数据都是一样的值参考来源:https://blog.csdn.net/weixin_44282947/article/details/118583626
 -
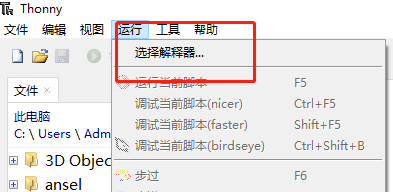
 MicroPython-ESP32开发环境搭建 相关工具及文件下载IDE-thonny:https://thonny.org/MicroPython:https://micropython.org/windows-ESP32驱动及其他相关文件:https://gitee.com/panxin1213/micropythontools/环境安装首先要安装thonny,然后安装windows-ESP32驱动,再将下载的micropython对应esp32电路板的烧录进板子中。thonny安装IDE安装很简单,直接下一步下一步就可以了。ESP32,windows驱动安装下载好驱动包后安装与系统版本相关的exe文件就可以了。MicroPython烧录1、打开thonny,选择运行-选择解释器2、在弹开的窗口中,选择thonny使用的解释器,这里使用MicroPython,然后Port部分选择安装好驱动的端口,这里要链接好电路板。3、如果是新的电路板,还没有烧录过环境的时候,需要点击Install or update firmware,烧录micropython解释器进入电路板,如下图所示,烧录环境4、烧录成功后,回显示done,表示成功,如果显示 Timed out waiting for packet header等错误,需要长按住电路板上的boot键,然后再按确定重新烧录。测试运行环境弄好后如下图,可以再thonny上看到对应链接上的电路板micropython环境及电路板上的python文件。


